
I’ve recently configured authentication for the Elastic Stack. To take some of the burden off managing permissions manually, we wanted to map Google Groups to Kibana roles, since we manage authentication to most of our systems using Google Groups.
Having followed Elastic’s documentation on setting up Google OIDC authentication, however, I found that this task is not so easy, as Google OIDC doesn’t return group memberships in the JWT that the application receives.
Why Doesn’t Google OIDC Propagate Group Information?
Google OIDC doesn’t support any notion of a groups claim that’s present in other OIDC providers, which can be observed by looking at Google’s OIDC configuration example). Unhelpfully, many unofficial snippets for configuring Google OIDC in Elastic erroneously include a groups claim, which gets confusing.
I was eager to get this to work somehow, as manually setting permissions would not work at scale and it would cause an overhead going forward.
Possible Solutions
I found that there are several ways that this problem could be solved. I’ll list my findings in order from the ones that are easiest to set up and best documented, to the slightly more complicated solutions.
Using an Alternative OIDC Provider
The official Elastic documentation also mentions setting up authentication using Okta and Azure AD. Both of these methods support returning group information. If your organisation uses and maintains these, this method could be a good alternative.
Solutions using Google SAML
Google Workspace/GSuite SAML can be used for authentication instead of Google OIDC. It can be set by following the Elastic documentation along with information from this Gist. Google SAML doesn’t return group information by default, but there are workarounds that I will describe. They do rely on Google SAML authentication being configured as described in the Gist, however.
Be wary that setting up a Google SAML app requires Google Workspace Super Admin privileges, so it’s worth checking if this is allowed in your organisation.
Note that the Kibana port numbers can be omitted from the SAML configuration if you’re using Elastic Cloud since Kibana is also available on port 443 by default. Saying this, make sure to keep it consistent and to use the same port everywhere. I configured SAML with ports omitted in the SAML configuration and with ports mentioned in the Kibana configuration initially, thinking that it would work, but Google returned errors.
Create Separate SAML Apps with Varying Permissions
This is the solution I settled for. As suggested by judge2020 on GitHub, first create separate SAML apps for each level of permissions that you want to set up. Only allow access to each to the appropriate Google Groups.
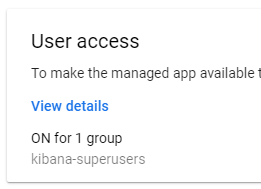
Then, have each app authenticate within a different SAML realm in your Elasticsearch configuration, which you can then map to your Kibana roles using a Kibana Role Mapping.
This solution doesn’t interfere with any existing user or group configurations, which is why I favoured it. However, it may not be appropriate if you want a lot of permission levels, as each level would need a separate SAML app. Configuring each app could be cumbersome, and you’d have to explain to your users why there are multiple Google login methods on your Kibana login page.
Configuration
Below is an example of how I configured Google SAML authentication, using two levels of permissions - one for standard users that have read-only access to Kibana, and one for superusers.
Elasticsearch settings:
xpack:
  security:
    authc:
      realms:
        saml:
          google-saml-standard-user:
              order: 4
              attributes.principal: "nameid"
              attributes.mail: "mail"
              attributes.name: "name"
              idp.metadata.path: "/app/config/saml/metadata.xml"
              idp.entity_id: "https://accounts.google.com/o/saml2?idpid=<Your SAML app entity ID>"
              sp.entity_id: "<Your Kibana URL>/#kibana-users"
              sp.acs: "<Your Kibana URL>/api/security/v1/saml"
          google-saml-superuser:
              order: 5
              attributes.principal: "nameid"
              attributes.mail: "mail"
              attributes.name: "name"
              idp.metadata.path: "/app/config/saml/metadata.xml"
              idp.entity_id: "https://accounts.google.com/o/saml2?idpid=<Your SAML app entity ID>"
              sp.entity_id: "<Your Kibana URL>/#kibana-superusers"
              sp.acs: "<Your Kibana URL>/api/security/v1/saml"
Kibana settings:
xpack.security.authc.providers:
  saml:
    google-saml-standard-user:
      order: 0
      realm: google-saml-standard-user
      description: "Log in with Google (Standard User)"
      icon: "https://upload.wikimedia.org/wikipedia/commons/5/53/Google_%22G%22_Logo.svg"
    google-saml-superuser:
      order: 1
      realm: google-saml-superuser
      description: "Log in with Google (Superuser)"
      icon: "https://upload.wikimedia.org/wikipedia/commons/5/53/Google_%22G%22_Logo.svg"
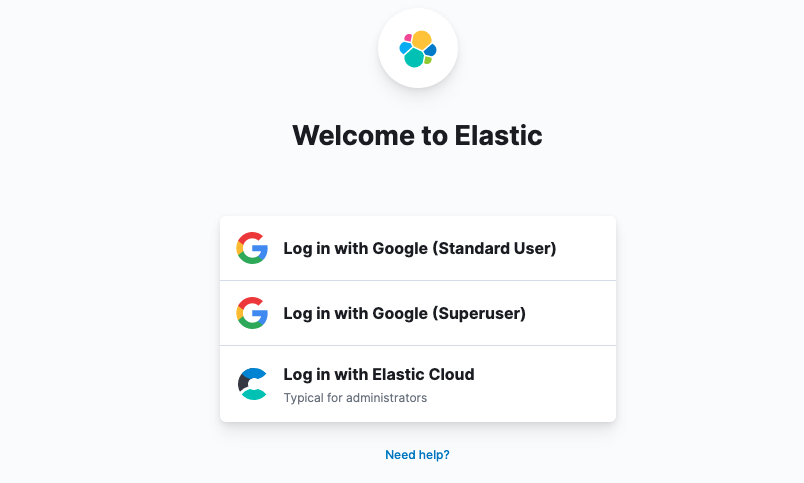
NOTE: the
descriptionandiconfields are not mandatory, but I wanted the login page to look nice. You can also addhintfields for subtitles, as shown in the Elastic Cloud login option in the screenshot below.
In the end, your Kibana Login page will have the different SAML apps listed:
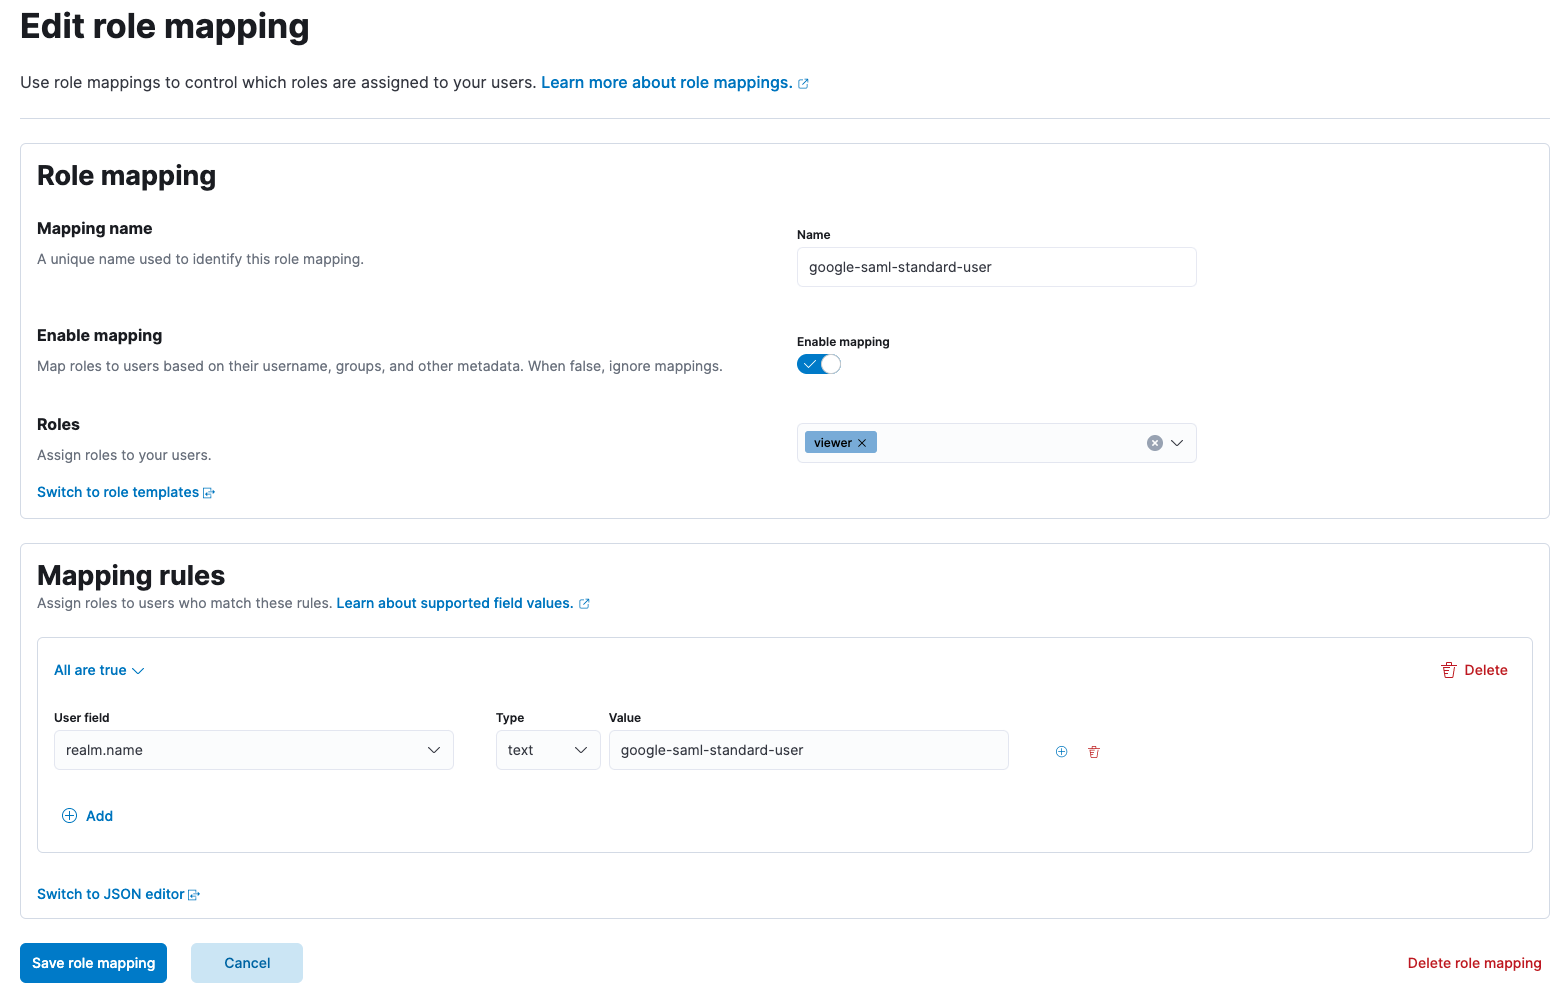
Your role mappings in Kibana can then be configured using the SAML realm names:
There are a couple of other caveats to this configuration:
- The SAML metadata file needs to be called
metadata.xml. It can be nested in any number of sub-directories if needed, which could be handy if you have multiple SAML authentication methods. To help with this, note that the uploaded metadata bundle will be extracted under/app/configas described in the Elastic docs. - Make sure the SAML realm names match in your Elasticsearch and Kibana configurations.
- To make your configuration Elastic 8.0 compliant, don’t set the
orderof any of your SAML realms to 3, as it’s reserved for the built-in Elastic Cloud SAML realm. The values 2 and 4-100 inclusive can be used instead.
Add a SAML Attribute Mapping
I haven’t tried this method personally, but the GitHub user sirachv has written up a guide on how to set it up on Github. It involves adding custom attributes to Google Workspace users and setting up the SAML app so that it returns those attributes.
This solution involves editing user configuration which I wanted to avoid, especially as the user configurations need to somehow be maintained when users are added. The author of this solution suggests running a Python script to do this. For our needs, this would be too much of an overhead, especially as the solution with multiple SAML apps doesn’t require this.
Configure Group Mapping by Adding a Custom Schema
A custom schema can be added to user accounts, as described in this article from Dynatrace. This involves having to reconfigure your groups in Google Workspace though, which may be a hassle if your organisation has a lot of users.
Last Resort - Configure Permissions Manually in Kibana
Finally, if all else fails - you may need to manually add users to roles in Kibana by whitelisting their names.
In some cases, this may be a fine solution. You can set up Google OIDC to authenticate if someone is in your organisation, which could act as a basis for a role with read-only permissions. Then, since usernames are returned from Google OIDC, you can whitelist names for higher levels of permissions. Whitelisting users for higher levels of permissions involves manual intervention, but in some use-cases with few users, this may be sufficient.